在 Armbian 操作系统上搭建基于 Hysteria2 协议的透明代理
上一篇文章我们提到了如何为中兴 B860AV1.1-T 电视盒子刷入 Armbian 操作系统,相信看到这篇文章的新老朋友已经拥有了一块基于 Armbian 操作系统的开发板或电视盒子,这篇文章将带领大家一起在 Armbian 操作系统中搭建 Hysteria2 协议的透明代理。
谈到在软路由上实现透明代理功能,很多朋友首先想到的是 OpenWrt 系统。的确,在 OpenWrt 上实现透明代理功能,只需要轻点几下鼠标,简单配置一下即可完成。OpenWrt 是一个基于 Linux 内核的开源系统,有大量的插件,软件生态丰富。很遗憾的一件事情,我至今都没使用过 OpenWrt 系统,虽然网络上也有很多博主在分享 Openwrt 的教程,但是没有系统性的教程,加上 OpenWrt 拥有大量的插件,每个插件具体可以实现什么功能、应该如何配置,把这些插件全部弄明白,需要花费太多的精力。因此,我更倾向于在 Linux 操作系统上实现透明代理的功能。虽然实现起来显得有点复杂,需要掌握好几个知识点,大量的命令看起来也有些晦涩难懂。但是我仍然建议大家可以耐心的看完,遇到不懂的命令,可以借助 ChatGPT 等工具查明白每条命令的含义,从原理上搞清楚数据包的流向,以及使用 iptables 是如果处理的。我也尽可能的注释清楚命令的含义,在明白原理后,今后不管使用 OpenWRT 或 routeOS 遇到相关问题,也会迎刃而解。
一、在 Armbian 操作系统中,解决不能使用鼠标在 vi 中实现粘贴功能
cat > ~/.vimrc <<EOF
set mouse=c
syntax on
EOF
说明:
第一行:设置成命令行模式,设置完成后代码高亮会消失;
第二行:设置代码高亮。
二、修改更新源为清华源
Armbian 操作系统默认使用的官方更新源(deb.debian.org)服务器在海外,连接速度和国内镜像源比起来较慢,建议修改为清华大学提供的镜像源。
1、首先使 apt 支持 https 传输协议,如果只用 http 传输协议可忽略这一步。
apt install apt-transport-https ca-certificates
2、修改更新源
mv /etc/apt/sources.list /etc/apt/sources.list.bak
cat > /etc/apt/sources.list <<EOF
deb https://mirrors.tuna.tsinghua.edu.cn/debian/ buster main contrib non-free
#deb-src https://mirrors.tuna.tsinghua.edu.cn/debian/ buster main contrib non-free
deb https://mirrors.tuna.tsinghua.edu.cn/debian/ buster-updates main contrib non-free
#deb-src https://mirrors.tuna.tsinghua.edu.cn/debian/ buster-updates main contrib non-free
deb https://mirrors.tuna.tsinghua.edu.cn/debian/ buster-backports main contrib non-free
#deb-src https://mirrors.tuna.tsinghua.edu.cn/debian/ buster-backports main contrib non-free
deb https://mirrors.tuna.tsinghua.edu.cn/debian-security/ buster/updates main contrib non-free
#deb-src https://mirrors.tuna.tsinghua.edu.cn/debian-security/ buster/updates main contrib non-free
EOF

mv /etc/apt/sources.list.d/armbian.list /etc/apt/sources.list.d/armbian.list.bak
cat > /etc/apt/sources.list.d/armbian.list <<EOF
deb https://mirrors.tuna.tsinghua.edu.cn/armbian buster main buster-utils buster-desktop
EOF
3、更新本机已安装的软件包
apt update
apt upgrade -y
4、在更新过程中可能会出现的错误及解决办法
①. 如出现如下错误,先使用 http 源,然后再执行 apt upgrade 更新 ca-certificates 即可解决,最后可以将源修改为 https 源。
Err:8 https://mirrors.tuna.tsinghua.edu.cn/ubuntu-ports focal Release
Certificate verification failed: The certificate is NOT trusted. The certificate chain uses expired certificate. Could not handshake: Error in the certificate verification. [IP: 101.6.15.130 443]
Err:9 https://mirrors.tuna.tsinghua.edu.cn/ubuntu-ports focal-security Release
Certificate verification failed: The certificate is NOT trusted. The certificate chain uses expired certificate. Could not handshake: Error in the certificate verification. [IP: 101.6.15.130 443]
Err:10 https://mirrors.tuna.tsinghua.edu.cn/ubuntu-ports focal-updates Release
Certificate verification failed: The certificate is NOT trusted. The certificate chain uses expired certificate. Could not handshake: Error in the certificate verification. [IP: 101.6.15.130 443]
Err:11 https://mirrors.tuna.tsinghua.edu.cn/ubuntu-ports focal-backports Release
Certificate verification failed: The certificate is NOT trusted. The certificate chain uses expired certificate. Could not handshake: Error in the certificate verification. [IP: 101.6.15.130 443]
Err:12 https://mirrors.tuna.tsinghua.edu.cn/mongodb/apt/ubuntu focal/mongodb-org/4.4 Release
Certificate verification failed: The certificate is NOT trusted. The certificate chain uses expired certificate. Could not handshake: Error in the certificate verification. [IP: 101.6.15.130 443]
②. 如果出现没有公匙,NO_PUBKEY 错误。
Reading package lists... Done
W: GPG error: https://mirrors.tuna.tsinghua.edu.cn/debian buster-backports InRelease: The following signatures couldn't be verified because the public key is not available: NO_PUBKEY 0E98404D386FA1D9 NO_PUBKEY 6ED0E7B82643E131
E: The repository 'https://mirrors.tuna.tsinghua.edu.cn/debian buster-backports InRelease' is not signed.
N: Updating from such a repository can't be done securely, and is therefore disabled by default.
N: See apt-secure(8) manpage for repository creation and user configuration details.
首先执行
# 查看你的错误输出,将下面命令中的 E77FC0EC34276B4B 替换为你实际的 recv-keys 值。
apt-key adv --keyserver keyserver.ubuntu.com --recv-keys 0E98404D386FA1D9
apt-key adv --keyserver keyserver.ubuntu.com --recv-keys 6ED0E7B82643E131
然后再次执行更新即可
apt update
apt upgrade -y
三、修改网卡地址
参考以下示例,为旁路由分配同网段的静态 IP 地址,hwaddress 参数用于固定 Mac 地址,Mac 地址可以在电视盒子背后的标签上找到,或者使用 ifconfig 命令查询。修改完成后使用 reboot 命令重启电视盒子,然后使用新的 IP 地址连接电视盒子。
vi /etc/network/interfaces

source /etc/network/interfaces.d/*
auto lo
iface lo inet loopback
auto eth0
allow-hotplug eth0
iface eth0 inet static
    hwaddress 88:88:88:88:88:88
    address 192.168.0.2
netmask 255.255.255.0
gateway 192.168.0.1
iface eth0 inet6 auto
四、关闭 NetworkManager
systemctl stop NetworkManager
systemctl disable NetworkManager
五、修改时区
1、查询系统时间和时区
# 可以使用 timedatectl 或 date -R 命令。
timedatectl
date -R
2、修改时区
#使用 tzselect 命令,然后选择 asia china beijing yes。
tzselect
cp /usr/share/zoneinfo/Asia/Shanghai /etc/localtime
3、再次查询系统时间和时区
# 可以使用 timedatectl 或 date -R 命令。
timedatectl
date -R
六、开启 IP 转发
1、在 /etc/sysctl.conf 的末尾添加以下内容(其中 eth0 修改为你网络接口的名称)。
echo "net.ipv4.ip_forward = 1" >> /etc/sysctl.conf
echo "net.ipv6.conf.all.disable_ipv6 = 0" >> /etc/sysctl.conf
echo "net.ipv6.conf.default.disable_ipv6 = 0" >> /etc/sysctl.conf
echo "net.ipv6.conf.lo.disable_ipv6 = 0" >> /etc/sysctl.conf
echo "net.ipv6.conf.default.use_tempaddr = 1" >> /etc/sysctl.conf
echo "net.ipv6.conf.all.forwarding = 1" >> /etc/sysctl.conf
echo "net.ipv6.conf.default.forwarding = 1" >> /etc/sysctl.conf
echo "net.ipv6.conf.all.accept_ra = 2" >> /etc/sysctl.conf
echo "net.ipv6.conf.default.accept_ra = 2" >> /etc/sysctl.conf
echo "net.ipv6.conf.eth0.accept_ra = 2" >> /etc/sysctl.conf
2、应用配置
sysctl -p
七、IP 分流
www.ipdeny.com 为我们提供了各个国家或地区的 ip 地址块,而且更新很及时。通过该项目提供的 ip 块列表,我们可以生成出 ipset 格式的 ip 集合,实现目标地址为国内的直连,目标地址为国外的走代理。
#安装 ipset
apt install ipset

# 创建国内的 IPv4 和 IPv6 地址集合
ipset -N cnipv4 hash:net
ipset -N cnipv6 hash:net family inet6

# 下载国内的 IPv4 和 IPv6 地址文件
wget https://www.ipdeny.com/ipv6/ipaddresses/aggregated/cn-aggregated.zone -P /tmp
wget https://www.ipdeny.com/ipblocks/data/countries/cn.zone -P /tmp

# 将内的 IPv4 和 IPv6 地址文件的内容导入 ipset 集合
for i in $(cat /tmp/cn.zone ); do ipset -A cnipv4 $i; done
for i in $(cat /tmp/cn-aggregated.zone ); do ipset -A cnipv6 $i; done
mkdir /etc/proxy

# 将 IPv4 和 IPv6 地址集合保存为 ipset 格式
ipset save cnipv4 > /etc/proxy/cnipv4.conf
ipset save cnipv6 > /etc/proxy/cnipv6.conf
八、加载 TProxy 模块
1、查询操作系统是否安装了 Tproxy 模块
root@arm-64:~# grep -i tproxy /boot/config-$(uname -r)
CONFIG_NFT_TPROXY=m
CONFIG_NETFILTER_XT_TARGET_TPROXY=m
CONFIG_NF_TPROXY_IPV4=m
CONFIG_NF_TPROXY_IPV6=m
2、加载 TProxy 模块
echo "nf_tables" >> /etc/modules
echo "nf_tables_ipv6" >> /etc/modules
echo "nf_tables_ipv4" >> /etc/modules
echo "xt_TPROXY" >> /etc/modules
九、修改系统的DNS服务器地址
echo "nameserver 1.1.1.1" > /etc/resolv.conf
echo "nameserver 1.0.0.1" >> /etc/resolv.conf
echo "nameserver 2606:4700:4700::1111" >> /etc/resolv.conf
echo "nameserver 2606:4700:4700::1001" >> /etc/resolv.conf
十、安装 hysteria2 客户端
hysteria2 的 v 2.2.3 及以下版本 ,有一个 Bug 尚未修复。具体表现为使用端口跳跃、同时使用了混淆,udpForwarding 转发失效。 例如转发 udp 数据包到 1.1.1.1 查询域名解析记录,会出现卡死的情况。如使用 v 2.2.3 及以下版本时,请关闭混淆后使用。建议服务器端及客户端均使用最新的 v 2.2.4 版本。
1、服务端配置示例,有关服务端的安装可参考《垃圾 VPS 线路的救星 - Hysteria1 节点纯手动安装教程》。
{
        "listen": ":8550",
        "tls": {
        "cert": "/etc/hysteria/example.hicairo.com.pem",
        "key": "/etc/hysteria/example.hicairo.com.hr.key"
        },
        "auth":{
        "type": "password",
        "password": "12345678"
        },
        "bandwidth":{
        "up": "1000 mbps",
        "down": "1000 mbps"
        },
        "ignoreClientBandwidth": false
}
2、在 Armbian 上安装 hysteria2 客户端
# 建议尽量不要使用 root 用户运行服务,我们创建一个名为 hysteria 的用户用于运行 hysteria 。
groupadd --system hysteria
useradd --system \
    --gid hysteria \
    --create-home \
    --home-dir /var/lib/hysteria \
    --shell /usr/sbin/nologin \
    --comment "hysteria server" \
    hysteria

# 下载 hysteria 可执行文件并修改文件属性
wget -O /usr/bin/hysteria https://mirror.ghproxy.com/https://github.com/apernet/hysteria/releases/download/app%2Fv2.2.4/hysteria-linux-arm64
chmod a+x /usr/bin/hysteria

# 创建配置文件目录
mkdir /etc/hysteria

# 客户端配置文件示例,其中 tcpTProxy 和 udpTProxy 定义了 Tproxy 监听的端口。
cat > /etc/hysteria/config.json <<EOF
{
  "server": "example.hicairo.com:8550,40000-45000",
  "auth":"12345678",
   "transport": {
    "type": "udp",
    "udp": {
      "hopInterval": "30s"
    }
  },
  "bandwidth": {
    "up": "30 mbps",
    "down": "100 mbps"
  },
  "fastOpen": true,
  "lazy": true,
  "tcpTProxy": {
    "listen": ":2500"
  },
    "udpTProxy": {
    "listen": ":2500"
  }
}
EOF

# 将 Hysteria 作为守护进程运行
# 在 /etc/systemd/system/ 目录创建 hysteria.service
cat > /etc/systemd/system/hysteria.service <<EOF
[Unit]
Description=Hysteria client Service (config.json)
After=network.target
[Service]
Type=simple
ExecStart=/usr/bin/hysteria -c /etc/hysteria/config.json client
WorkingDirectory=/etc/hysteria
User=hysteria
Group=hysteria
Environment=HYSTERIA_LOG_LEVEL=info
CapabilityBoundingSet=CAP_NET_ADMIN CAP_NET_BIND_SERVICE CAP_NET_RAW
AmbientCapabilities=CAP_NET_ADMIN CAP_NET_BIND_SERVICE CAP_NET_RAW
NoNewPrivileges=true
[Install]
WantedBy=multi-user.target
EOF

# 启动 Hysteria 服务端
chown -R hysteria:hysteria /etc/hysteria/
systemctl daemon-reload
systemctl enable hysteria
systemctl start hysteria

#查看当前状态
systemctl status hysteria

#使用更改的配置文件重新加载 hysteria
systemctl reload hysteria
十一、使用 dnsmasq + gfwlist 进行域名解析分流
对于已经被污染的域名,我们需要使用国外的 dns 服务器解析出正确的 ip 。gfwlist 项目为我们提供了被污染的域名列表,同时 dnsmasq 支持设置某个域名使用那个 dns 服务器进行解析,这样就完美的解决了该问题。当然可能有小伙伴会提出,所有的域名全部通过代理走国外的 dns 服务器进行解析,这样该问题也不就解决了吗?是的,这样的确解决了该问题。但是国外的 dns 的服务器延迟往往很高,会造成打开网页速度慢等情况,这也就是在本地使用 dnsmasq 架设小型 dns 服务器的原因,另外 dnsmasq 支持 cache 功能,通过 dnsmasq 解析过的域名,会缓存在本地 dns 服务器里,在 ttl 有效期内,当客户端再次发起对该域名的解析请求时,dnsmasq 会直接将该域名的 ip 发送给客户端,从而提高域名的解析效率。
# 安装 dnsmasq
apt install dnsmasq

# 修改dnsmasq.conf文件
echo "port=53" >> /etc/dnsmasq.conf
echo "cache-size=10240" >> /etc/dnsmasq.conf
# 以下两行是 dnsmasq 的日志功能,默认已经注释,如需要调试,去掉前面的 #
echo "#log-queries" >> /etc/dnsmasq.conf
echo "#log-facility=/var/log/dnsmasq.log" >> /etc/dnsmasq.conf

#创建上游dns服务器地址文件,建议使用本地运营商提供的dns地址,这样速度最快。
cat > /etc/dnsmasq.d/upstream.conf <<EOF
server=223.5.5.5
server=223.6.6.6
server=2400:3200::1
server=2400:3200:baba::1
EOF

# 使用 gfwlist 生成黑名单域名列表
wget -O /usr/bin/gfwlist2dnsmasq.sh https://mirror.ghproxy.com/https://raw.githubusercontent.com/hiifeng/gfwlist2dnsmasq/master/gfwlist2dnsmasq.sh
chmod a+x /usr/bin/gfwlist2dnsmasq.sh
sh /usr/bin/gfwlist2dnsmasq.sh -d 1.1.1.1 -p 53 -o /etc/dnsmasq.d/dnsmasq_gfwlist.conf

# 重启 dnsmasq
systemctl restart dnsmasq
十二、配置透明代理并设置分流
1、常见错误的处理方法
# 如果出现如下错误,原因为 Debian buster 使用 nftables 而不是 iptables,处理方法是调用 update-alternatives 强制 Debian 用 iptables 而不是 nftables。
root@aml:/usr/sbin# iptables -t nat -A PREROUTING -p udp --dport 53 -j REDIRECT --to-ports 53
iptables v1.8.2 (nf_tables):  CHAIN_ADD failed (No such file or directory): chain PREROUTING

# 执行如下两行命令
sudo update-alternatives --set iptables /usr/sbin/iptables-legacy
sudo update-alternatives --set ip6tables /usr/sbin/ip6tables-legacy
2、配置 ipv4 透明代理并设置分流
# IPV4 开始
# 劫持客户端的 DNS
iptables -t nat -A PREROUTING -p udp --dport 53 -j REDIRECT --to-ports 53
iptables -t nat -A PREROUTING -p tcp --dport 53 -j REDIRECT --to-ports 53
# === 代理客户端流量 - 开始 ===
iptables -t mangle -N HYSTERIA
# 跳过已经由 TProxy 接管的流量,目标端口为53的数据包不进行标记
iptables -t mangle -A HYSTERIA -p tcp -m socket --transparent ! --dport 53 -j MARK --set-mark 0x1
iptables -t mangle -A HYSTERIA -p udp -m socket --transparent ! --dport 53 -j MARK --set-mark 0x1
iptables -t mangle -A HYSTERIA -m socket -j RETURN
# 绕过私有和特殊 IPv4 地址
iptables -t mangle -A HYSTERIA -d 0.0.0.0/8 -j RETURN
iptables -t mangle -A HYSTERIA -d 10.0.0.0/8 -j RETURN
iptables -t mangle -A HYSTERIA -d 127.0.0.0/8 -j RETURN
iptables -t mangle -A HYSTERIA -d 169.254.0.0/16 -j RETURN
iptables -t mangle -A HYSTERIA -d 172.16.0.0/12 -j RETURN
iptables -t mangle -A HYSTERIA -d 192.168.0.0/16 -j RETURN
iptables -t mangle -A HYSTERIA -d 224.0.0.0/4 -j RETURN
iptables -t mangle -A HYSTERIA -d 240.0.0.0/4 -j RETURN
# 目标地址为中国的IPv4地址直连
iptables -t mangle -A HYSTERIA -m set --match-set cnipv4 dst -j RETURN
# 重定向流量到 TProxy 端口
iptables -t mangle -A HYSTERIA -p tcp -j TPROXY --on-port 2500 --on-ip 127.0.0.1 --tproxy-mark 0x1
iptables -t mangle -A HYSTERIA -p udp -j TPROXY --on-port 2500 --on-ip 127.0.0.1 --tproxy-mark 0x1
# 启用上述规则
iptables -t mangle -A PREROUTING -j HYSTERIA
# === 代理客户端流量 - 结束 ===
# === 代理本机流量 - 开始 ===
iptables -t mangle -N HYSTERIA_MARK
# 通过匹配用户来避免环路
iptables -t mangle -A HYSTERIA_MARK -m owner --uid-owner hysteria -j RETURN
# 绕过局域网和特殊 IPv4 地址
iptables -t mangle -A HYSTERIA_MARK -d 0.0.0.0/8 -j RETURN
iptables -t mangle -A HYSTERIA_MARK -d 10.0.0.0/8 -j RETURN
iptables -t mangle -A HYSTERIA_MARK -d 127.0.0.0/8 -j RETURN
iptables -t mangle -A HYSTERIA_MARK -d 169.254.0.0/16 -j RETURN
iptables -t mangle -A HYSTERIA_MARK -d 172.16.0.0/12 -j RETURN
iptables -t mangle -A HYSTERIA_MARK -d 192.168.0.0/16 -j RETURN
iptables -t mangle -A HYSTERIA_MARK -d 224.0.0.0/4 -j RETURN
iptables -t mangle -A HYSTERIA_MARK -d 240.0.0.0/4 -j RETURN
# 目标地址为中国的IPv4地址直连
iptables -t mangle -A HYSTERIA_MARK -m set --match-set cnipv4 dst -j RETURN
# 重路由 OUTPUT 链流量到 PREROUTING 链
iptables -t mangle -A HYSTERIA_MARK -p tcp -j MARK --set-mark 0x1
iptables -t mangle -A HYSTERIA_MARK -p udp -j MARK --set-mark 0x1
# 启用上述规则
iptables -t mangle -A OUTPUT -j HYSTERIA_MARK
# === 代理本机流量 - 结束 ===
# IPV4 结束
3、配置 ipv6 透明代理并设置分流
# IPV6 开始
# 劫持客户端的 DNS
ip6tables -t nat -A PREROUTING -p udp --dport 53 -j REDIRECT --to-ports 53
ip6tables -t nat -A PREROUTING -p tcp --dport 53 -j REDIRECT --to-ports 53
# === 代理客户端流量 - 开始 ===
ip6tables -t mangle -N HYSTERIA
# 跳过已经由 TProxy 接管的流量,目标端口为53的数据包不进行标记
ip6tables -t mangle -A HYSTERIA -p tcp -m socket --transparent ! --dport 53 -j MARK --set-mark 0x1
ip6tables -t mangle -A HYSTERIA -p udp -m socket --transparent ! --dport 53 -j MARK --set-mark 0x1
ip6tables -t mangle -A HYSTERIA -m socket -j RETURN
# 仅对公网 IPv6 启用代理
ip6tables -t mangle -A HYSTERIA ! -d 2000::/3 -j RETURN
# 目标地址为中国的IPv6地址直连
ip6tables -t mangle -A HYSTERIA -m set --match-set cnipv6 dst -j RETURN
# 重定向流量到 TProxy 端口
ip6tables -t mangle -A HYSTERIA -p tcp -j TPROXY --on-port 2500 --on-ip ::1 --tproxy-mark 0x1
ip6tables -t mangle -A HYSTERIA -p udp -j TPROXY --on-port 2500 --on-ip ::1 --tproxy-mark 0x1
# 启用上述规则
ip6tables -t mangle -A PREROUTING -j HYSTERIA
# === 代理客户端流量 - 结束 ===
# === 代理本机流量 - 开始 ===
ip6tables -t mangle -N HYSTERIA_MARK
# 通过匹配用户来避免环路
ip6tables -t mangle -A HYSTERIA_MARK -m owner --uid-owner hysteria -j RETURN
# 仅对公网 IPv6 启用代理
ip6tables -t mangle -A HYSTERIA_MARK ! -d 2000::/3 -j RETURN
# 目标地址为中国的IPv6地址直连
ip6tables -t mangle -A HYSTERIA_MARK -m set --match-set cnipv6 dst -j RETURN
# 重路由 OUTPUT 链流量到 PREROUTING 链
ip6tables -t mangle -A HYSTERIA_MARK -p tcp -j MARK --set-mark 0x1
ip6tables -t mangle -A HYSTERIA_MARK -p udp -j MARK --set-mark 0x1
# 启用上述规则
ip6tables -t mangle -A OUTPUT -j HYSTERIA_MARK
# === 代理本机流量 - 结束 ===
# IPV6 结束
4、设置开机启动透明代理
# 保存 iptable 规则
iptables-save > /etc/proxy/rules.v4
ip6tables-save > /etc/proxy/rules.v6

# 设置透明代理启动脚本
cat > /etc/proxy/start_proxy.sh <<EOF
#!/bin/bash
# Create By ifeng
# Web Site:https://www.hicairo.com
# Telegram:https://t.me/HiaiFeng
ipset restore < /etc/proxy/cnipv4.conf
ipset restore < /etc/proxy/cnipv6.conf
ip rule add fwmark 0x1 lookup 100
ip route add local default dev lo table 100
ip -6 rule add fwmark 0x1 lookup 100
ip -6 route add local default dev lo table 100
iptables-restore /etc/proxy/rules.v4
ip6tables-restore /etc/proxy/rules.v6
EOF
chmod a+x /etc/proxy/start_proxy.sh

# 设置关闭透明代理脚本
cat > /etc/proxy/stop_proxy.sh <<EOF
#!/bin/bash
# Create By ifeng
# Web Site:https://www.hicairo.com
# Telegram:https://t.me/HiaiFeng
ip rule del fwmark 0x1 lookup 100
ip route del local default dev lo table 100
ip -6 rule del fwmark 0x1 lookup 100
ip -6 route del local default dev lo table 100
iptables -t mangle -F
ip6tables -t mangle -F
sleep 5
ipset destroy cnipv4
ipset destroy cnipv6
EOF
chmod a+x /etc/proxy/stop_proxy.sh

# 通过 systemctl 启动透明代理,设置启动文件
cat > /etc/systemd/system/proxy.service <<EOF
[Unit]
Description=Tproxy rule
After=network.target
Wants=network.target
[Service]
Type=oneshot
RemainAfterExit=yes
ExecStart=/etc/proxy/start_proxy.sh
ExecStop=/etc/proxy/stop_proxy.sh
[Install]
WantedBy=multi-user.target
EOF

# 启动透明代理
systemctl daemon-reload
systemctl enable proxy
systemctl start proxy

# 查看当前状态
systemctl status proxy
十三、创建定时任务
gfwlist 项目提供的被污染域名列表和 www.ipdeny.com 提供的 ip 地址块会随时进行更新,我们使用 crontab 创建一个定时任务,可以定时抓取最新的域名列表和 ip 地址块。
1、创建更新脚本
echo -e '#!/bin/bash
# Create By ifeng
# Web Site:https://www.hicairo.com
# Telegram:https://t.me/HiaiFeng\n
export PATH=/bin:/sbin:/usr/bin:/usr/sbin\n
sh /usr/bin/gfwlist2dnsmasq.sh -d 1.1.1.1 -p 53 -o /etc/dnsmasq.d/dnsmasq_gfwlist.conf
systemctl restart dnsmasq\n
rm /tmp/cn*\n
wget -q https://www.ipdeny.com/ipv6/ipaddresses/aggregated/cn-aggregated.zone -P /tmp
wget -q https://www.ipdeny.com/ipblocks/data/countries/cn.zone -P /tmp\n
ipset flush cnipv4
ipset flush cnipv6\n
for i in $(cat /tmp/cn.zone ); do ipset -A cnipv4 $i; done
for i in $(cat /tmp/cn-aggregated.zone ); do ipset -A cnipv6 $i; done\n
ipset save cnipv4 > /etc/proxy/cnipv4.conf
ipset save cnipv6 > /etc/proxy/cnipv6.conf' > /etc/proxy/crontab.sh

chmod a+x /etc/proxy/crontab.sh
2、设置定时任务
以下示例给出了两条规则,任选其一即可,你也可以参考 crontab 语法,自定义更新频率。
# 每天 3:00 执行定时更新任务
echo "0 3 * * * /bin/bash /etc/proxy/crontab.sh" | crontab -

# 每周星期天 3:00 执行定时更新任务
echo "0 3 * * 0 /bin/bash /etc/proxy/crontab.sh" | crontab -
十四、性能优化
hysteria 官方建议我们调整 Linux 系统的缓冲区大小来提供性能。
# 查询缓冲区大小
root@arm-64:~# sysctl net.core.rmem_max
net.core.rmem_max = 212992
root@arm-64:~# sysctl net.core.wmem_max
net.core.wmem_max = 212992

# 默认的缓冲区只有208KB,将发送、接收两个缓冲区都设置为 16 MB。
echo "net.core.rmem_max=16777216" >> /etc/sysctl.conf
echo "net.core.wmem_max=16777216" >> /etc/sysctl.conf

# 应用配置
sysctl -p
十五、实现原理的简单介绍
到这一步透明代理的功能就已经实现了,当把局域网中其他客户端的 dns 设置为公网中的任意 dns 服务器,同时将网关指向这台旁路由,就可以科学上网了。但是有些小伙伴可能还是有点懵,不知道数据包在旁路由中是如果进行处理的,下面我就根据自己的理解简单介绍以下,如有不对之处,请通过 telegram (https://t.me/HiaiFeng)告诉我,谢谢
1、ip 分流
ip 分流应该比较好理解,使用了 www.ipdeny.com 提供的大陆地区的 ip 地址块,然后在 iptables 规则中进行判断,如果数据包中目标地址为大陆地区的 ip ,直接 RETURN ,使其不走代理。
2、域名解析劫持
域名解析服务器默认监听的端口为 53 ,如果发现数据包的目标端口为 53 ,则重定向到本地的 53 端口。本地运行的 dnsmasq 服务监听了 53号端口,这样不管局域网内客户端设置了公网上的那个 dns 服务器,都会劫持到 dnsmasq 服务进行解析。
同时,我再解释一下在处理局域网其他主机传入的数据包时,目标端口为 53 的数据包为什么不能标记。因为我们要使用 dnsmasq 进行域名解析分流,有 0x1 标记的数据包会被重定向到本地的透明代理服务,该服务(hysteria TProxy)监听在本地的2500端口上,这样该数据包就走代理服务出去了。
# 跳过已经由 TProxy 接管的流量,目标端口为53的数据包不进行标记
iptables -t mangle -A HYSTERIA -p tcp -m socket --transparent ! --dport 53 -j MARK --set-mark 0x1
iptables -t mangle -A HYSTERIA -p udp -m socket --transparent ! --dport 53 -j MARK --set-mark 0x1
局域网内域名解析的数据包流向如下:
局域网内域名解析的数据包 -> mangle表 -> nat表
3、域名解析分流
gfwlist 项目提供了受污染的域名列表,同时 dnsmasq 支持针对不同的域名,使用不同的 dns 服务器(上游 dns 服务器)进行解析。举一个简单的例子,www.google.com 这个域名包含在 gfwlist 黑名单中,当客户端发起对该域名解析请求时, dnsmasq 会通过设置的 1.1.1.1 进行解析;www.sohu.com 这个域名没有在 gfwlist 黑名单中,当客户端发起对该域名解析请求时, dnsmasq 会通过 /etc/dnsmasq.d/upstream.conf 文件中设置的 dns 服务器进行解析。 同时 dnsmasq 支持 cache 功能,通过 dnsmasq 解析过的域名,会缓存在本地 dns 服务器里,在 ttl 有效期内,当客户端再次发起对该域名的解析请求时,dnsmasq 会直接将该域名的 ip 发送给客户端。从而提高域名的解析效率。
4、iptable 数据包流向
iptable 其实并不复杂,但是要搞明白,就需要从最基本的三个要素讲起,iptables 规则的三个要素是表(table)、链(chain)和规则(rule)。另外,很多小伙伴一上手就直接写 iptable 规则,或者看到别人写的规则进行简单的复制粘贴,也搞不清楚为什么要那样写,这样出现问题的时候,没办法自己进行排查。所以我的建议是,有关 iptable 尽可能的从最基础的基本概念学起,把大学还给老师的内容,再一点点的学回来。虽然这些最基本的概念很枯燥乏味,但是是必须要了解的。下面我尽量简单的讲一下在透明代理中的数据包流向问题。
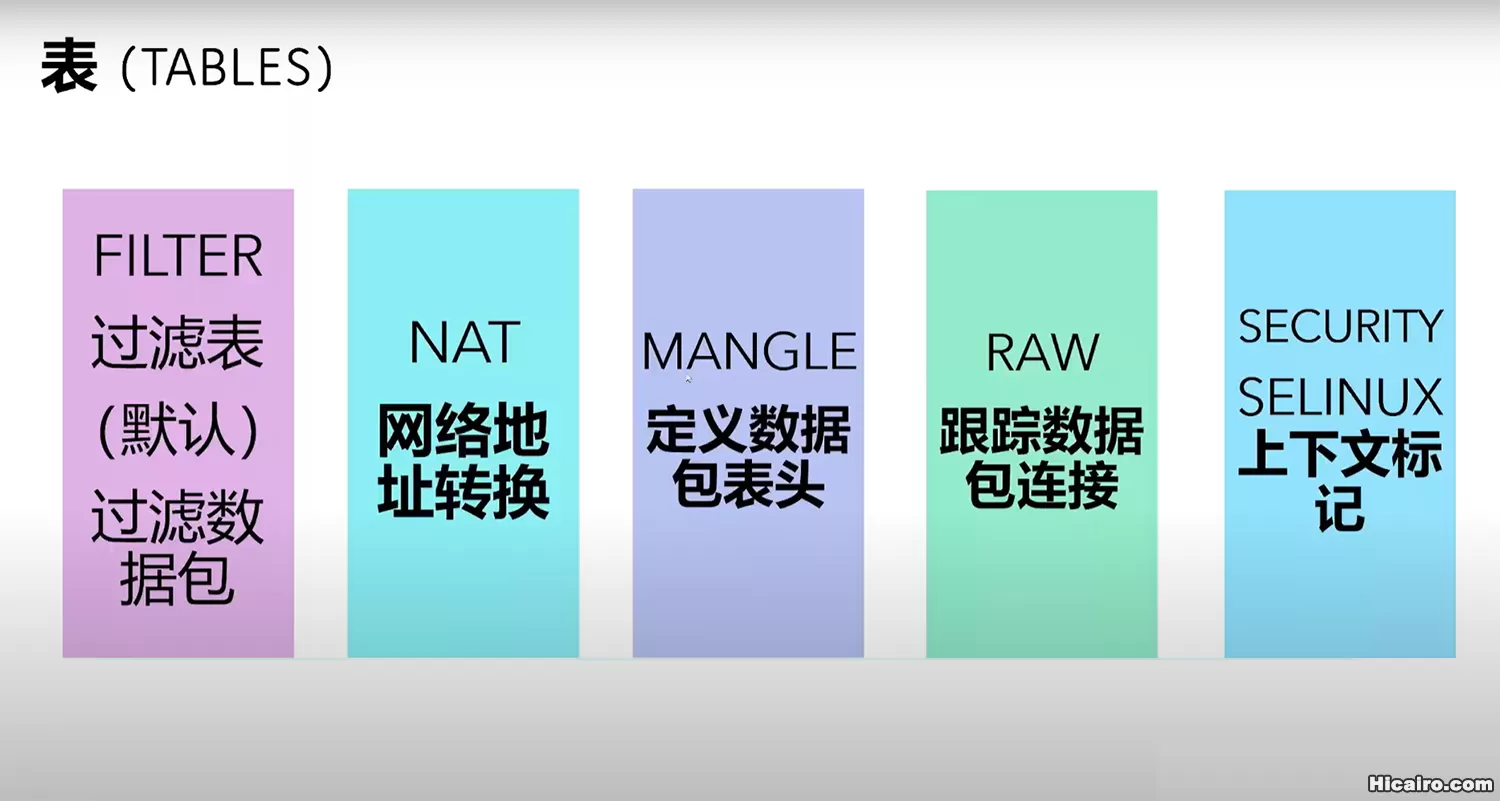
下图描述了 iptables 的 5 张表和主要功能,其中常用的三张主表为 filter、nat 和 mangle 表。
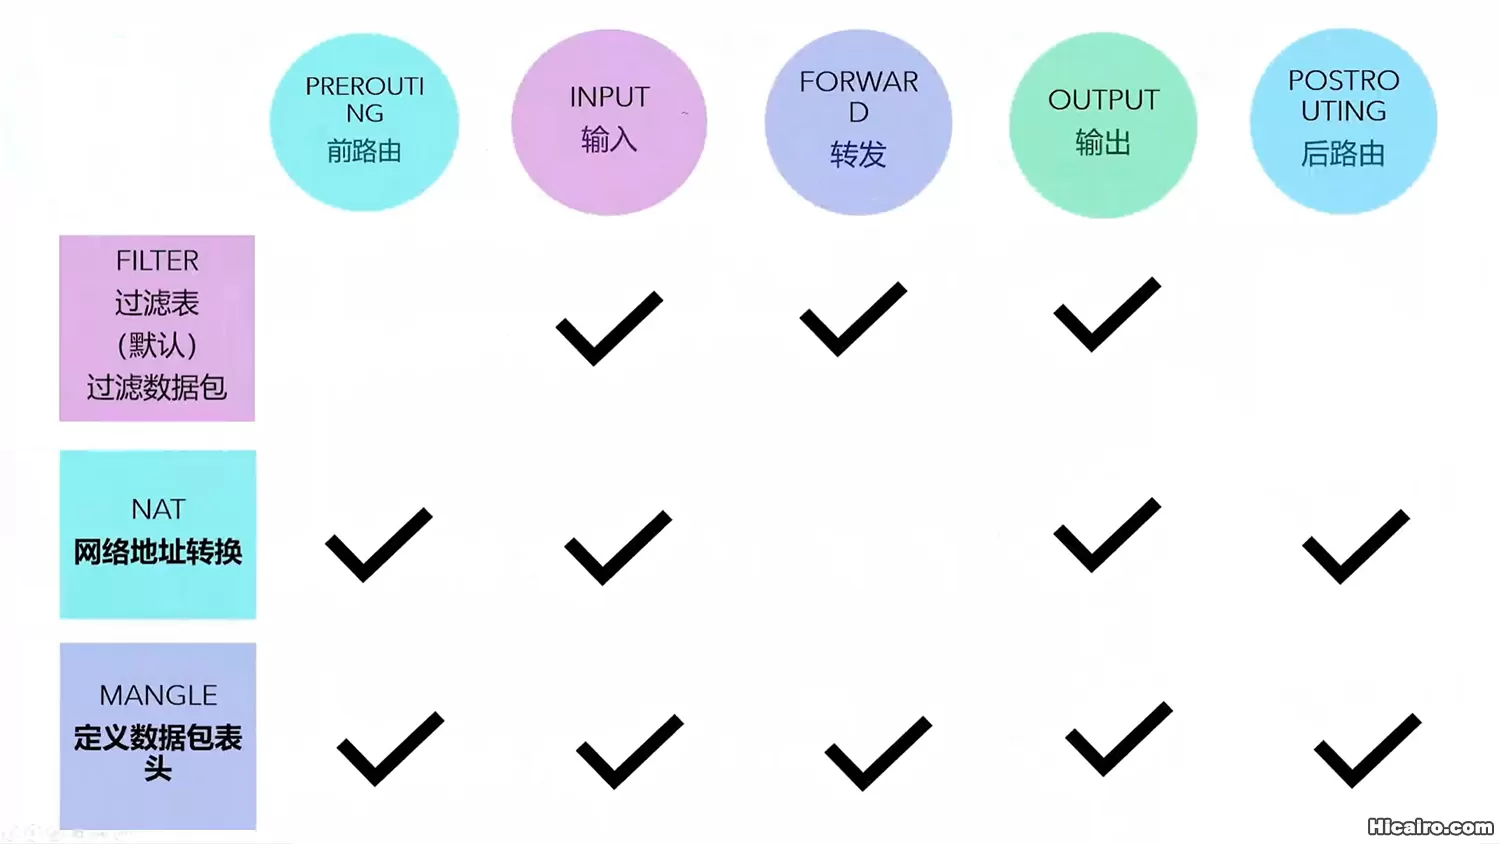
 下图描述了 iptables 中的 3 张主表可以使用 5 个链中的那几个链。
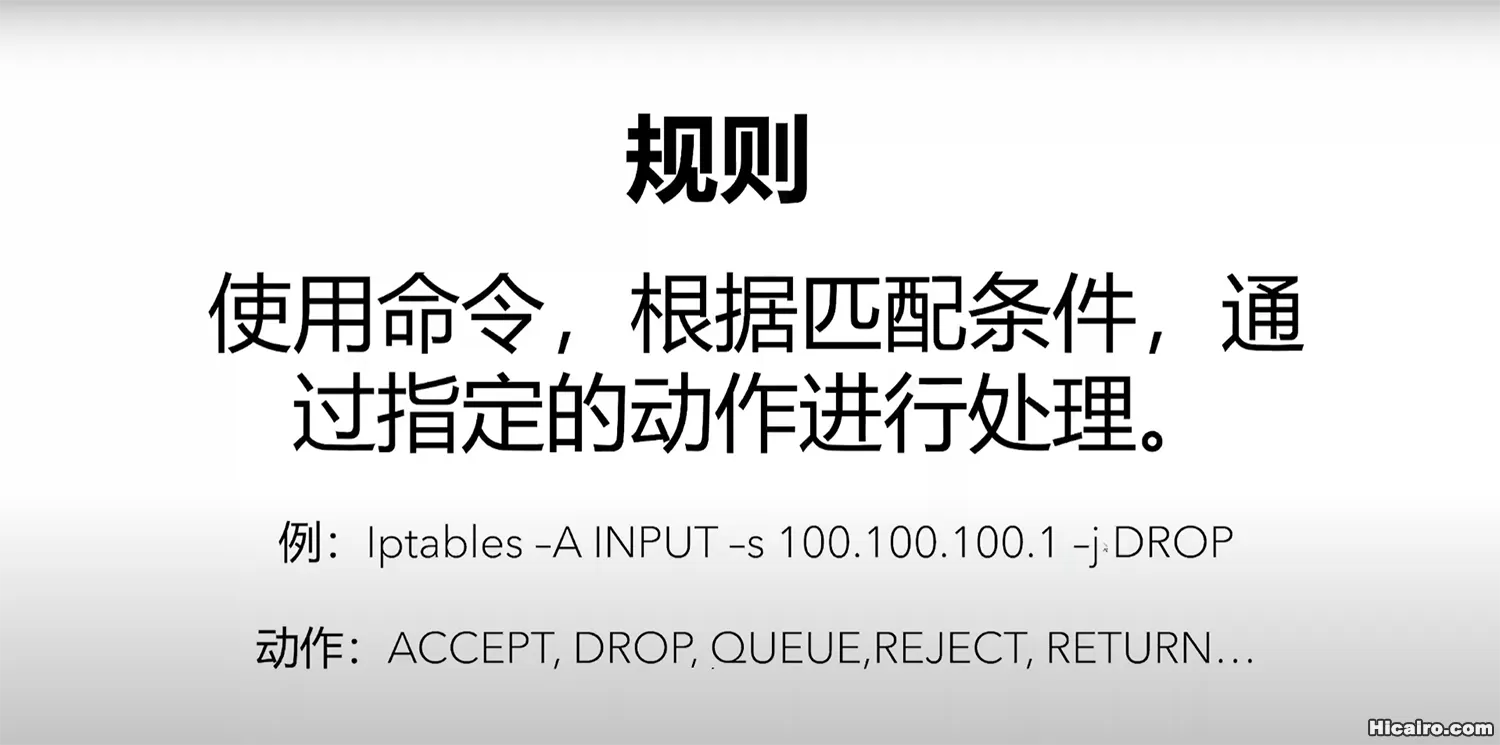
 下图描述了 iptables 规则的写法及常用动作。有关 iptables 详细的用法可以在 archwiki 上查询。
 下图描述了数据包经过 iptable各个表/链的先后次序。
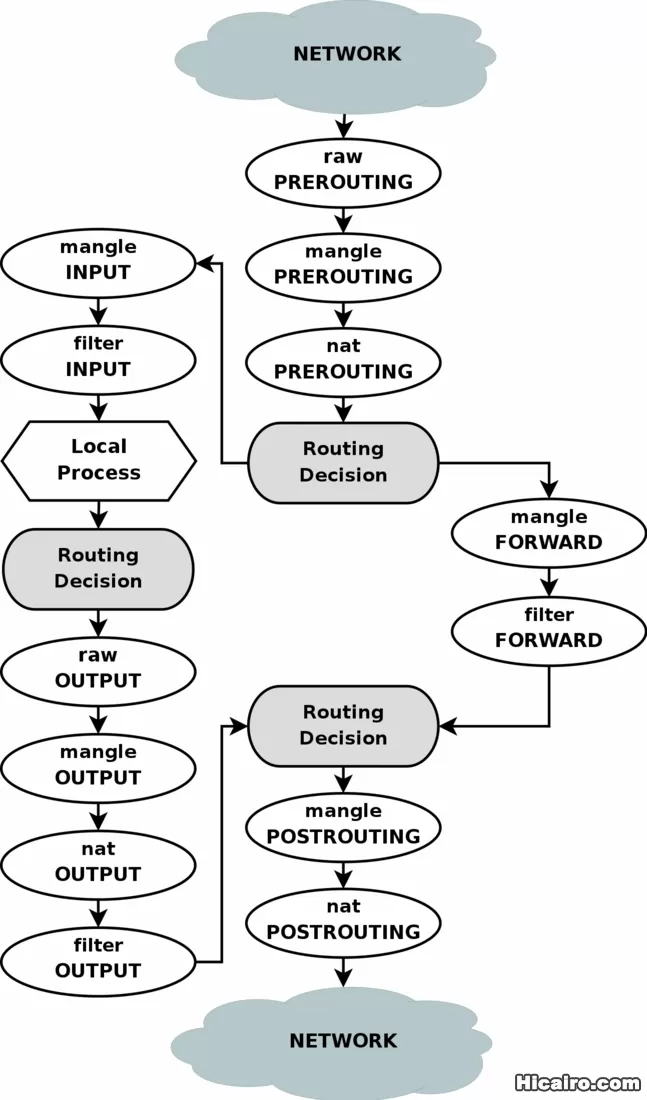
当一个数据包从某个 interface(网络接口) 进来时,会以这张图所示的顺序经过各个链。
图中第一个 Routing decision 取决于包的目的地是否是本机。如果是,则进入 INPUT 链 ,否则进入 FORWARD 链。
可以在链里写入-A(ppend) / -I(nsert) 规则来对包进行操作。规则会被逐个遍历,方式如下图。
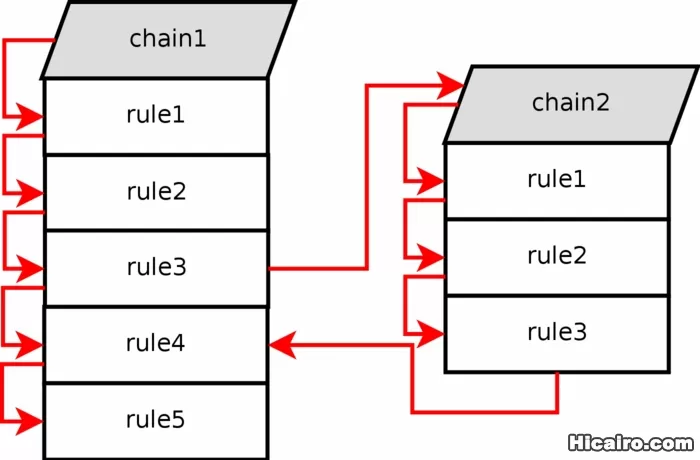
规则里可以写匹配规则来实现包的过滤,如 -s|-d <IP range> 匹配 source/dest ip ,-p <protocol> 匹配协议等。用 ! 来反匹配。
用 -j TARGET 来指定要对匹配到的包进行的操作。
内建的 TARGET 有 ACCEPT(停止遍历当前表的所有规则,进入下一个表的链),DROP(直接丢掉)和 RETURN(停止遍历当前链的规则,返回调用当前链的上一级链,继续遍历)等,具体见 man iptables。
有若干 extension 可以使用,见 man iptables-extensions。也可以将自定义的链作为 TARGET。
-j LOG --log-prefix "netfilter "很适合用来输出日志帮助调试。日志可以用 dmesg -S | grep netfilter 来查看。
以上是有关 iptables 的一些基本概念。另外细心的小伙伴应该也发现了,上述iptable规则中,分为了两大块,一块是针对 ipv4 数据包的处理,使用的是 iptables ,另一块是针对 ipv6 数据包的处理,使用的是 ip6tables。同时每大块又分为了两小块,一块是针对局域网内传入的数据包进行处理,另一块是针对本机产生的流量进行处理。
我们参考“数据包经过 iptable各个表/链的先后次序”那张图片,思考几个问题。
① 15.2 中提到的域名解析劫持,如果对目标端口为 53 的数据包进行了标记,那这个数据包将重定向到本地的 2500 端口,被本地运行的 TProxy 服务接管了,就不会经过 nat 表中的 PREROUTING 链进行处理,从而无法实现域名解析劫持。
iptables -t nat -A PREROUTING -p udp --dport 53 -j REDIRECT --to-ports 53
iptables -t nat -A PREROUTING -p tcp --dport 53 -j REDIRECT --to-ports 53
②有关 ip 分流我们使用了如下规则:
# 目标地址为中国的IPv4地址直连
iptables -t mangle -A HYSTERIA -m set --match-set cnipv4 dst -j RETURN
我们来思考一下数据包流向,首先一个目的地址 ip 为大陆的数据包传入,首先进入 mangle 表,mangle 的 PREROUTING 链有如下一条规则。这时该数据包会进入 mangle 表中名称为 HYSTERIA 的自定义链中进行规则匹配,上面的规则就匹配到了,动作是 RETURN ,RETURN 的含义是停止遍历当前链的规则,返回调用当前链的上一级链,继续遍历。意味着该数据包返回到调用当前链的上一级链(mangle 表的 PREROUTING 链)继续遍历。结果mangle 的 PREROUTING 链只有如下一条规则,并且已经遍历过了,该数据包就会查找 mangle 表的其他链是否有规则需要遍历,结果发现没有,这样就进入 nat 表,一步步的按照设定的 iptable 规则和路由表流出了。
iptables -t mangle -A PREROUTING -j HYSTERIA
通过以上示例,我相信大家针对 iptables 这个知识点,脑子里有一个大致的概念,当然详细的规则和用法需要参考官方的文档。同时针对不同的软路由,例如 routeOS 、OpenWRT对于数据包过滤、数据包的重定向原理都是一样的,搞明白基本概念和原理,在遇到故障时,也可以轻松排除,这也是本文真正的目的。
参考文献:
https://wiki.archlinux.org/title/iptables#Basic_concepts
https://manpages.debian.org/unstable/manpages-zh/iptables.8.zh_CN.html
https://strugglers.net/~andy/blog/2011/09/04/linux-ipv6-router-advertisements-and-forwarding/
https://fishbubble.foxb612.com/post/iptables-tproxy-v2ray.html
https://v2.hysteria.network/zh/docs/advanced/TPROXY/
本文出处:HiFeng'Blog
本文链接:https://www.hicairo.com/post/70.html
版权声明:本博客所有文章除特别声明外,均采用CC BY-NC-SA许可协议。转载请注明出处!
下一篇 >>